Disinfectants are important products for keeping facilities and the people in them healthy and safe. When used as directed, disinfectants help prevent the spread of colds, influenza and other infectious diseases. If improperly applied, however, you might as well spray them down the drain, since applying disinfectants incorrectly renders them ineffective!
How can you avoid “disinfectant disaster”? Below are 10 tips on how to use and apply disinfectants properly, to protect the health of those in your facility.
1. Add Fiber. Microfiber, that is. Mops and cleaning cloths made of synthetic microfiber are considered by some experts to be more effective than those made from natural based fibers, due to their resistance to “quat binding”. According to CleanLink.com in the article What is Quat Binding and Why It Must Be Prevented, “The phenomenon of quat binding occurs when the active ingredient (quaternary ammonium chloride) becomes attracted to and absorbed into fabrics. The science behind how this happens is simple: Quats are positively charged ions and cotton and other natural textiles are negatively charged; positive attracts negative.” Opt for microfiber over cotton when applying quat-based disinfectants, so they don’t get absorbed.

2. A Clear Solution. The disinfectant solution in your mop bucket can get contaminated as you clean floors and dip your mop back into the bucket. If the solution is not changed often enough, you may end up simply re-spreading bacteria (and dirt) over floors. Conventional custodial practices in healthcare settings recommend changing mop water every 2-3 rooms. However, when you use microfiber mops as recommended in #1 above, the mophead is replaced after every room, but never put back into the disinfectant solution, ensuring the integrity of the disinfectant and preventing cross-contamination.
3. Hit the Hot Spots. Under the right conditions, bacteria can double their numbers in as little as 20 minutes. “Hot Spot” surfaces that are frequently touched − doorknobs, light switches, elevator buttons, handrails − accumulate germs more quickly and need to be disinfected more often. Restroom surfaces should also be disinfected frequently, with toilet and faucet handles being havens for germs. Don’t neglect less obvious surfaces like towel dispensers, toilet paper holders, garbage cans and hand dryers.
4. Clear Out the Dirt. Clean before you apply disinfectants. Remove visible surface soil, then apply your disinfectant according to label directions. Note that some disinfectants have been tested for organic soil tolerance for certain pathogens, which can be especially important in healthcare settings. This means that the disinfectant will kill those pathogens in a certain percentage of organic soil, like blood.
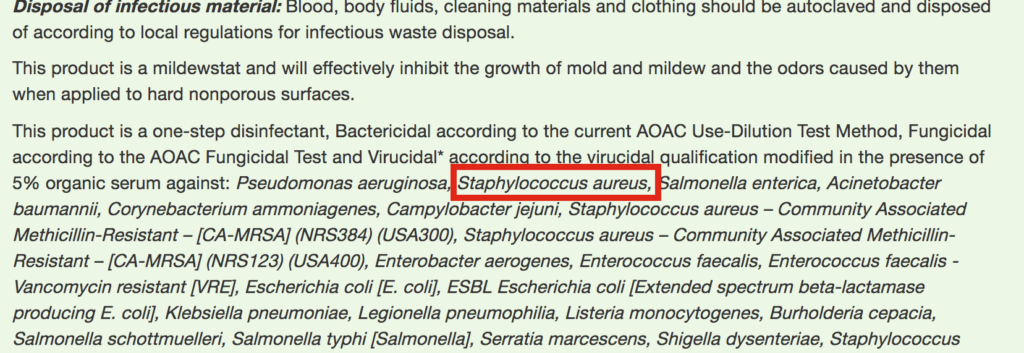
5. Be Specific. Before you apply disinfectants, read the label to be sure the specific bacteria, viruses and other germs you want to eradicate are listed in the “kill claims.” Chemical labels contain valuable information that will tell you this and many other things including guidelines for proper use, first aid directions, and hazard warning/danger statements. As an example, if you want to be sure you’re disinfecting for Staphylococcus aureus, it will be listed on the label, like below.
6. Time is on Your Side. Disinfectants have “dwell times” listed on their label, indicating how long they must remain wet on a surface in order to kill various pathogens. The disinfectant MUST be wet on the surface for the duration of the contact time to be effective. Again, refer to label directions. You can also visit Jsdoer online product pages, which include specific directions for virucidal, fungicidal, and mold and mildew control. Scroll down to the Directions on this example product page.
7. Concentrate on the Right Ratio. Disinfectants that come in concentrate form must be diluted in exactly the ratio indicated on the label. Any more or less water added will mean disinfectant disaster.
8. Don’t Mix. NEVER mix disinfectants with cleaners or other chemicals. Mixing a disinfectant with anything else will completely change its properties and it will no longer be effective.
9. The Hard Facts. If you are in an area with hard water, check concentrated disinfectant labels for hard water tolerance to be certain they will still be effective when diluted. Ready-to-use (RTU) disinfectants like Sani-Spritz Spray are a great alternative, since they are pre-formulated.
10. Choose Wisely. We recently wrote an entire article called Types of Disinfectants and How to Make the Best Choice for Your Facility. In it we explain various categories of disinfectants along with their pros and cons. Reference this article to help make the best choices for your facility, and keep the following considerations in mind as you evaluate your options:
- Effectiveness – Does the disinfectant kill the microbes and pathogens that are of top concern in your facility?
- Kill/Dwell Time – How quickly does a disinfectant product kill a specific pathogen? Does the product keep surfaces visibly wet in order to comply with the kill time?
- Safety – Is the product safe to use for people, and safe for the surfaces it is being applied to?
- Ease of use – Are the steps required to use a given disinfectant practical for your facility?
From choosing the right product for each application to knowing when and how to apply it, disinfectant use is serious business. Facilities that fail to make informed choices, ignore product instructions, or apply disinfectants incorrectly are putting the safety of visitors and employees at risk and setting themselves up for potential disinfectant disaster. When you evaluate your disinfectant needs carefully and educate yourself on using them correctly, it will help you to avoid a crisis and guarantee sanitary success.
